
YSC Blog

Gelcoat ageing
18 September, 2020
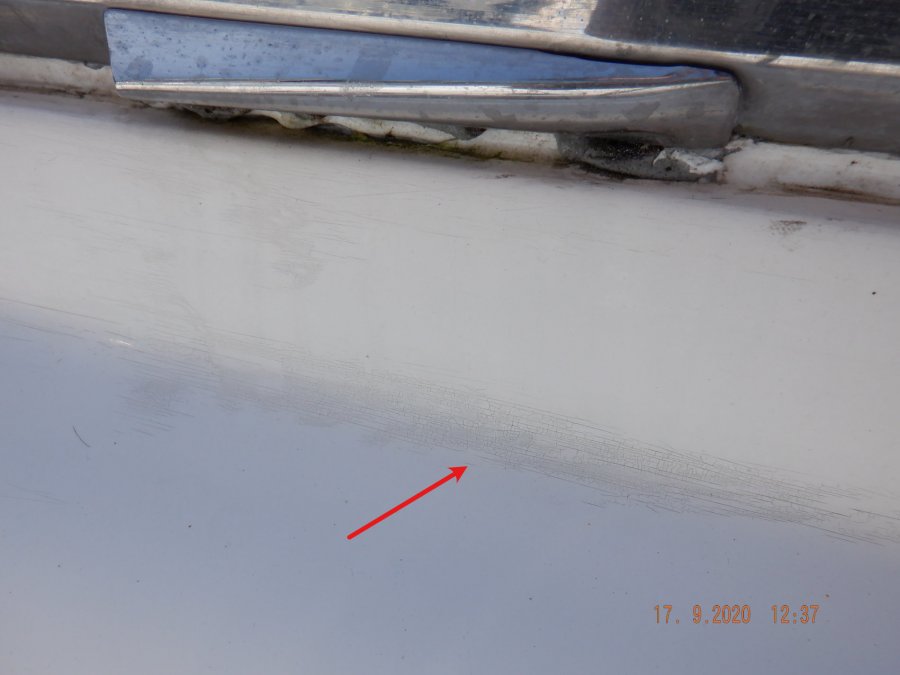
Gelcoat can develop fine cracks over time on the decks and superstructure.
This damage is caused by the ageing and hardening of the gelcoat through the passage of time from UV and heat cycles. It normally affects vessel over 20years of age but sometimes younger boats if they are exposed to high levels of sunlight such as in the Med or Caribbean.
These can can sometimes be seen on sink drains where hot water and detergents run down the hull and accelerate the process.
The damage is irreversible and cannot be polished out however it can be reduced visually by regular cleaning but dirt soon creeps back into the cracks and shows up again.
To eliminate the damage the areas must sanded back, prepared and then either fresh gelcoat applied or paint. As it affects a large area this can involve the whole deck moulding in order to match the finish which is no small task.
Halyard wrap
4 March, 2018
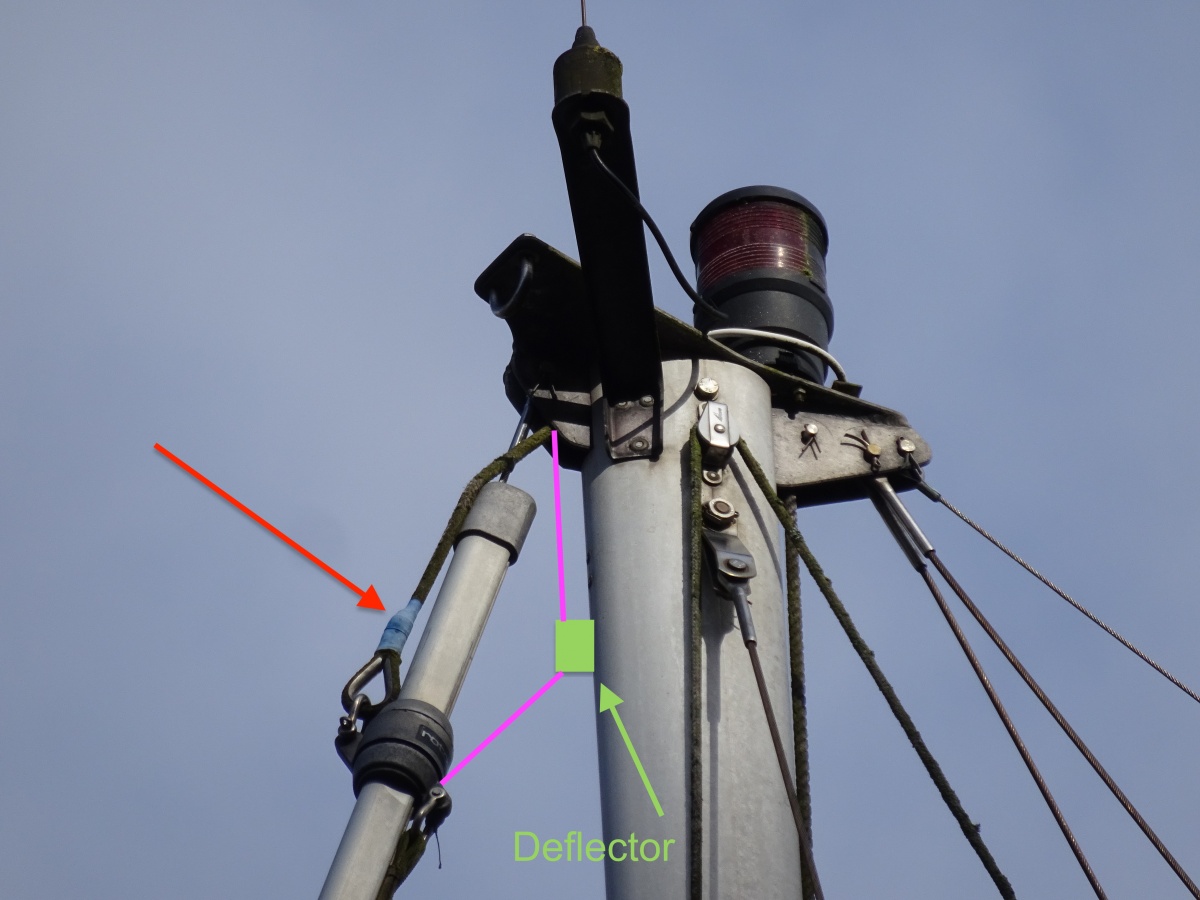
Halyard wrap occurs when the foresail halyard runs at too close an angle to the forestay on furler reefing systems. Unfortunately its quite common and can lead to the failure of the forestay itself.
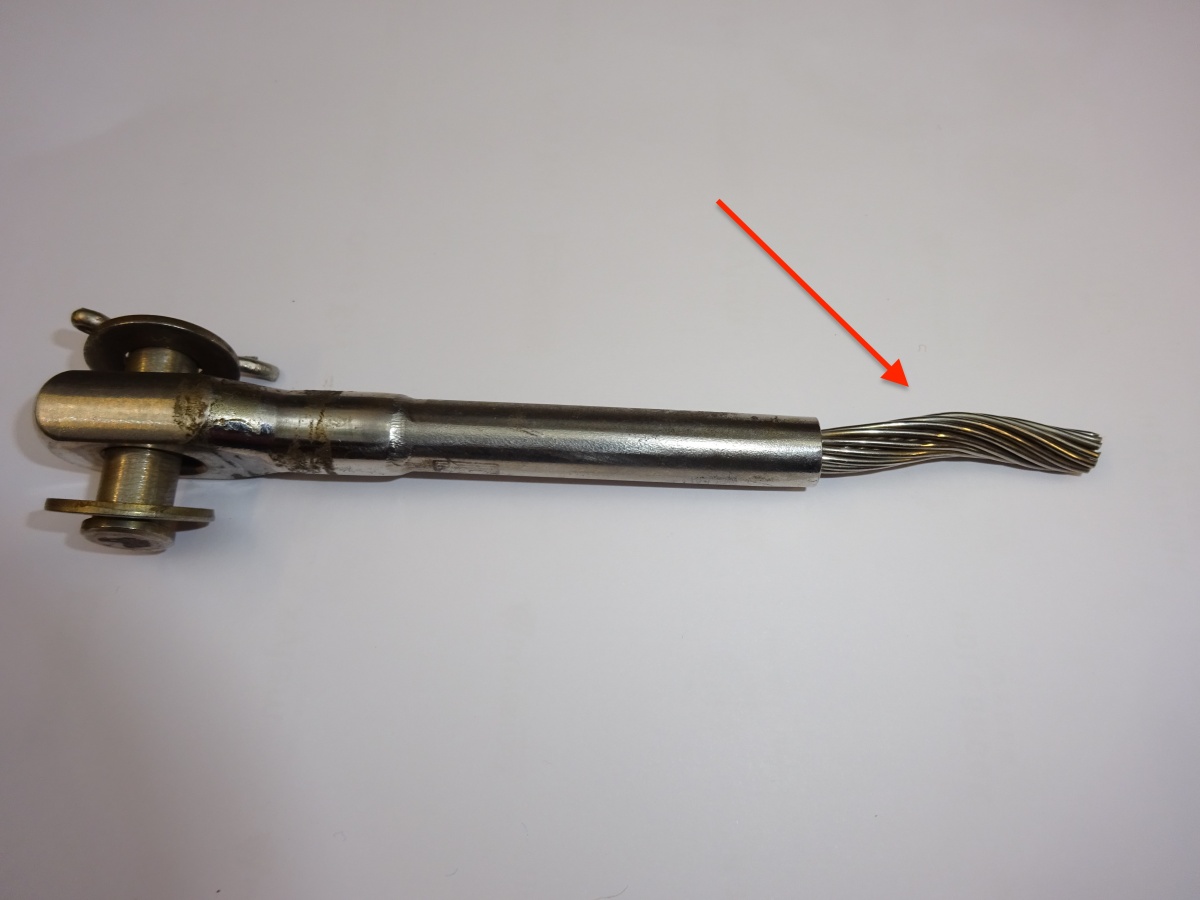
On the mast shown above the halyard has already wrapped itself around the forestay foil. As you try to unfurl the sail, the twisting load is transferred to the stay and you start to unwind the wire strands of the forestay. Eventually this can lead to the failure of the wire and a dismasting. The damaged wire looks like the second image.
 I have seen this on boats less than 10 years old with the furling system fitted from new so don’t assume your boat is alright just because it is newer.
To prevent halyard wrap from happening a defector is required. This effectively pulls the halyard exit down the mast a little and increases the angle between the halyard and the stay preventing it from being able to wrap around. A halyard deflector costs around £20-£40 and can be fitted without unstepping the mast.
Check your halyard angle by using binoculars ora camera with a zoom lens. If you have any doubt contact your local rigger to get it sorted.
Multi-use skin fittings
5 November, 2017
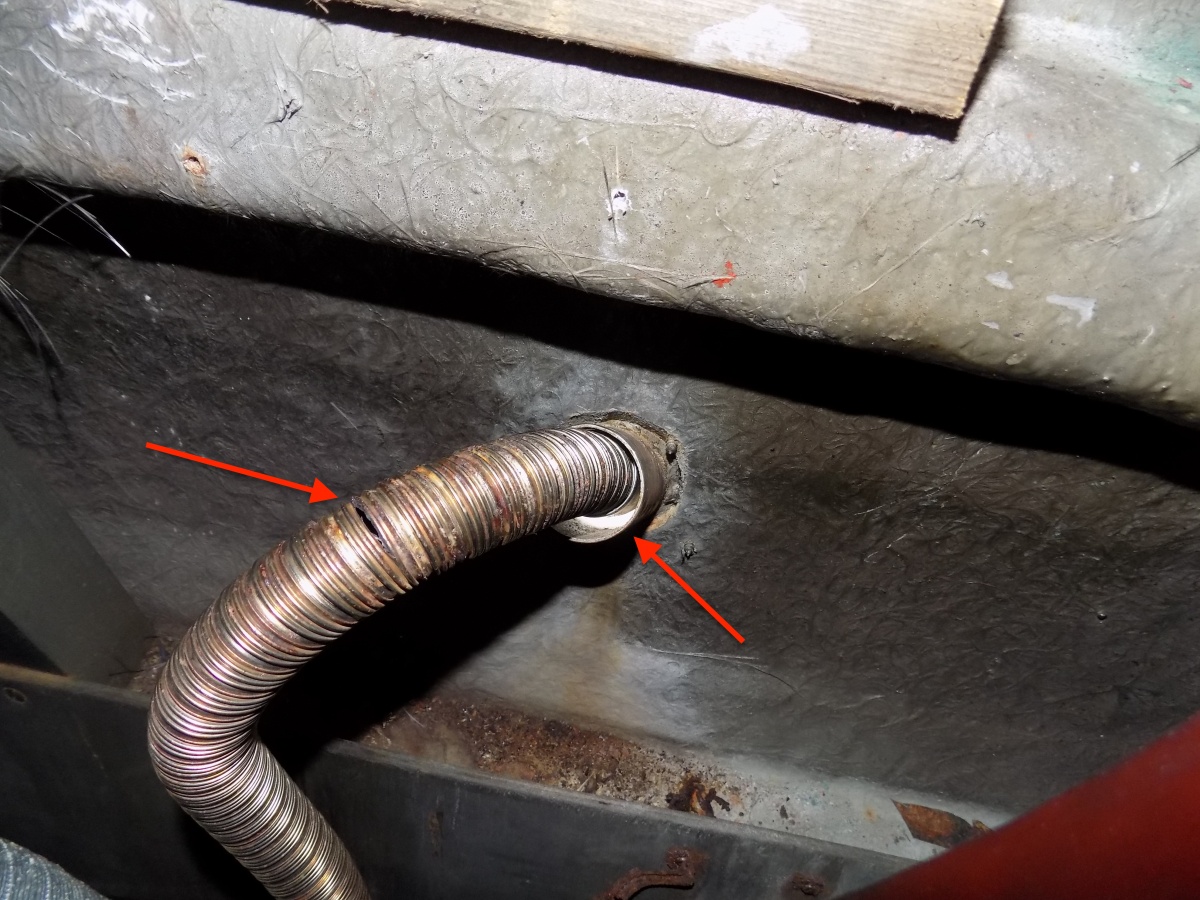
 Using a skin fitting for multiple uses might seem like a good idea to start with as it reduces the number of holes in the hull. This can however reduce the effectiveness of the items sharing the skin fitting.
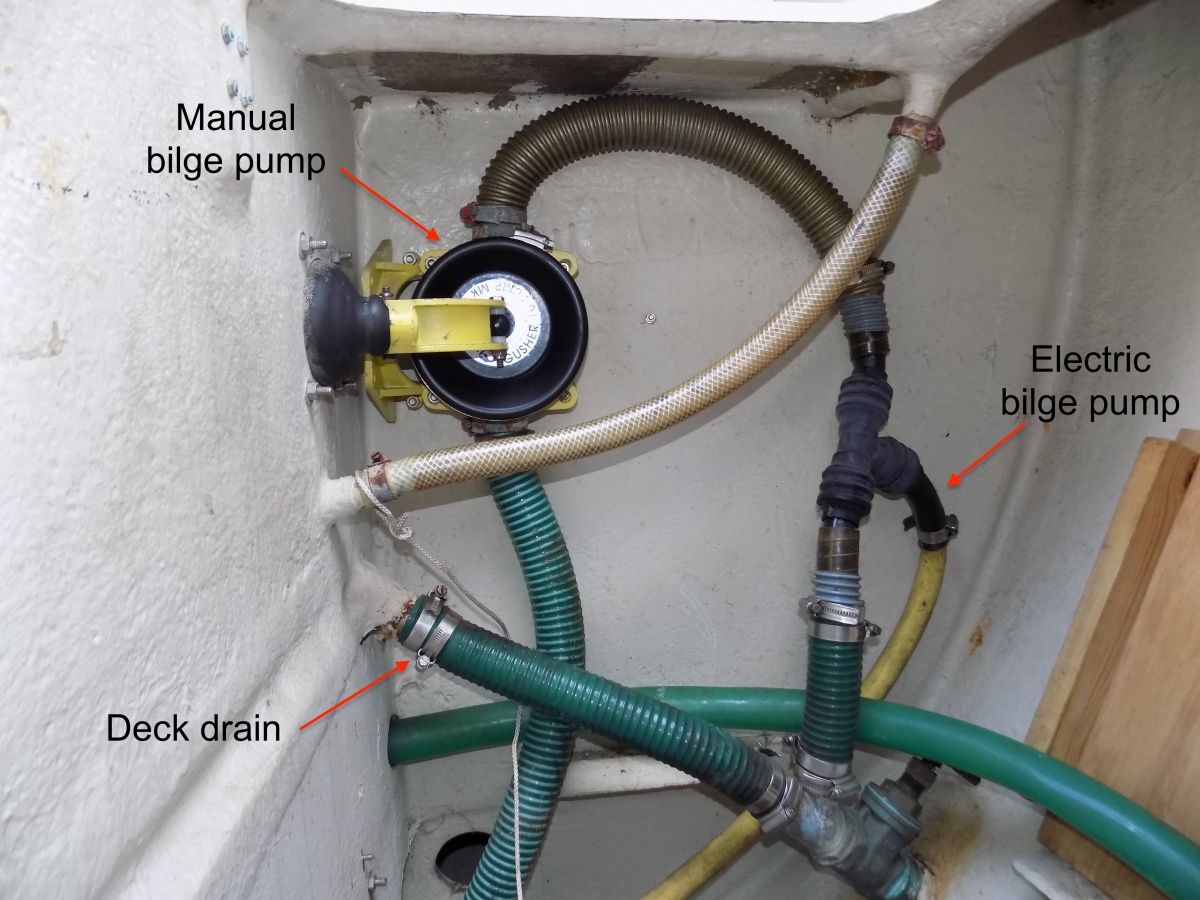
In the vessel shown above, the seacocks’ primary use was for the cockpit drain but this one has had a manual bilge pump and then an electric bilge pump added using ’T’ pieces. Each pipe has its flow rate determined but its diameter and the pressure you can apply to it. The total flow will be restricted by the diameter of the single outlet.
The cockpit drain will be using gravity to allow water to flow out. If you now start pumping with the electric bilge pump the cockpit will not be able to drain as fast. Similarly if you have to start using the manual bilge pump because of an emergency you will have to pump even harder to force the water through the seacock to reach the full capacity of the pump. In this setup you may also start pumping water back into the cockpit.
In the example shown, the manual pump would also be restricted by the smaller diameter ’T’ piece fitted for the electric bilge pump. This could easily halve the capacity of the manual bilge pump.
An improved installation would be to fit two new above the water line skin fittings for the bilge pumps and have the seacock dedicated for the cockpit drain. Keep all pipes and skin fittings the same diameter to ensure maximum flow.
Marine diesel heaters
9 October, 2017
Not all heaters are created equal.
When looking to buy a diesel heater to extend the summer sailing season some people are understandably tempted to try and save money by buying a cheaper road version of the Eberspächer or Webasto diesel heaters. This has become even easier to do when many are offered on sites such as Ebay or Gumtree describing them as marine units. Don't be fooled into thinking the manufacturers are selling the same unit but higher priced just because it has the word ‘marine’ in front of it. There are differences and they are important ones when installing in a boat.
The marine version of these units use stainless steel fittings instead of galvanised ones. The fuel hose must be copper not plastic and no inline plastic fuel filters should be fitted. The stainless steel exhaust hose must be lagged and comes with a longer length and most importantly, it comes with a skin fitting to take it safely outside of the hull. There are other differences but this is not intended as an installation instruction only a cautionary note.
In the photo above the owner had installed a road going version of the heater in his motor boat. The exhaust was not lagged - even though it can reach temperatures up to 200∘C near the heater. There was no skin fitting, just the hose poked though an open hole with no clamping. The hose also had a corrosion split that was leaking exhaust fumes directly into the living space.
Whilst it is possible to fit your own units you must do your research to find the correct way in order to make the installation safe and if you aren't sure, please consult a professional.
Crevice corrosion
26 September, 2017
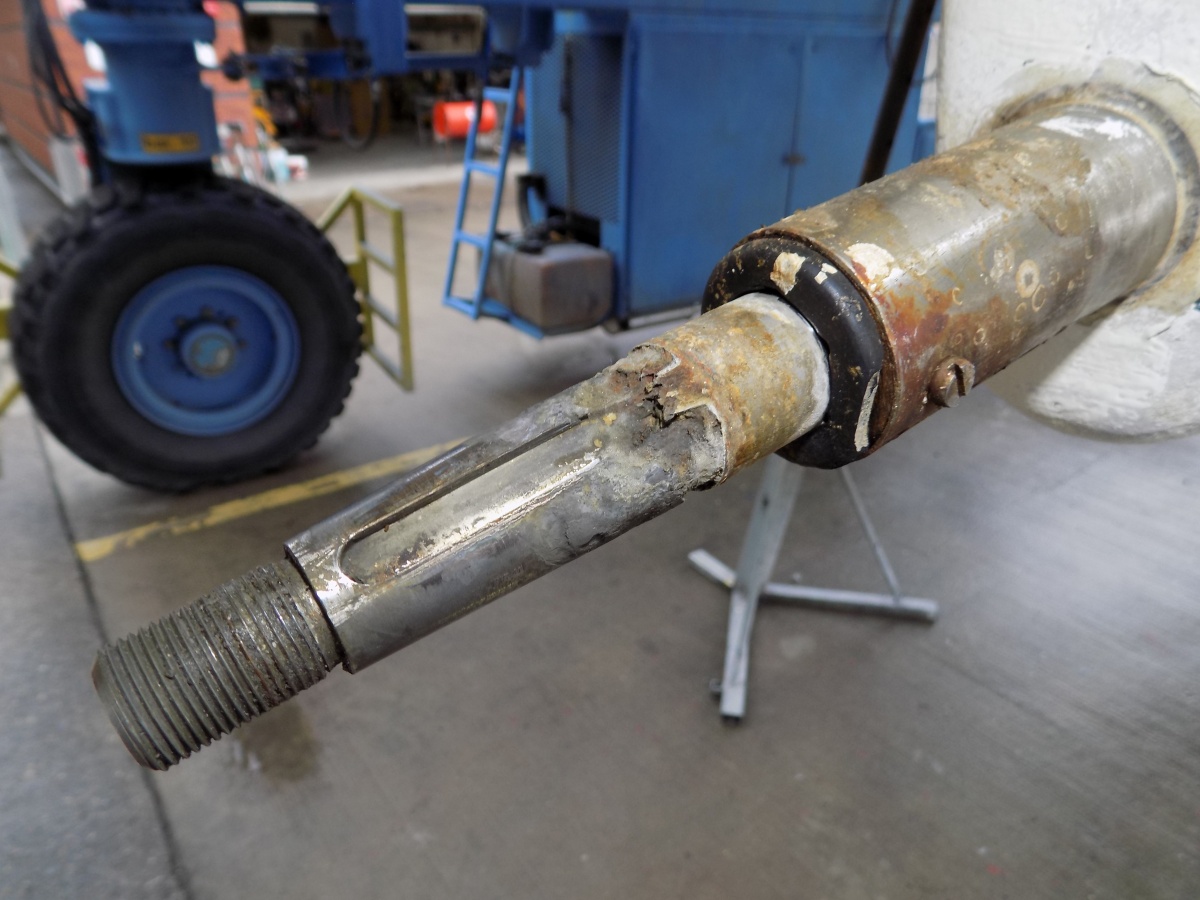
Cavity corrosion is another form of corrosion that can occur where you often don't inspect regularly.
Stainless steel is only stainless in the presence of oxygen and if you take the oxygen away, the stainless will corrode pretty easily. Water can become oxygen depleted in areas where it sits without moving. This normally happens in areas that are left hidden in small crevices and cracks such as rigging swages but can equally happen in cutless bearings and stern tubes if the vessel is not used or the prop shaft not turned regularly.
In the example above for some unknown reason, there was a tiny groove cut into the prop shaft taper just under the boss of the propeller. Over time the water that collected in it became stagnant and oxygen depleted causing crevice corrosion to develop unseen. This one was only found when the anode was being changed during a survey and the engineer noticed the propeller move very slightly on the shaft. This shows the shaft taper when the prop was removed, after cleaning it was found that nearly half the shaft had been eroded!
Normally crevice corrosion is only found when taking apart components but obviously things like standing rigging swages can’t be dismantled hence its one of the reasons for changing it every 10 years even though it looks alright on the surface.
To help prevent it, don't use stainless steel in areas that are likely to trap moisture where it can’t move unless it is the best material for other reasons. Crevice corrosion is also one reason why stainless steel seacocks are generally not the best option for boats.